Assessment 2: Console Setup
Nintendo Wii
 |
(from left to right) Nintendo Wii, AV cable, Power cable, Sensor bar.
The Audio Visual cable outputs the audio and video to the TV screen. The Power cable connects the console to the mains electricity. The Sensor bar interacts with the controllers wirelessly to allow the player to control the game. |
 |
| Nintendo Wii controller with "Nunchuk" attachment. The Nunchuk attachment is used in mostly used with games that require a second style of movement because it features an analogue joystick. The basic Wii remote features two menu buttons, a plus and minus button, a home button, A button, directional pad, power button and B trigger button located on the back of the remote. The Nunchuk attachment adds |
 |
| Sensor bar input (left) AV output (right) Power input (bottom) |
 |
| The AV cable uses a SCART adapter to interface with the TV. |
 |
| Sensor Bar |
 |
| Power light set on standby |
 |
| Power button pressed and changed to green to show it is on. Eject button (bottom) pressed to eject disk. |
 |
| Insert the disc you want to play with. |
 |
| Change the TV extension to the appropriate number and use the controller to navigate the menu. When initially setting up the Wii the player has to press the 1 button and the 2 button at the same time and wait for the controller to connect. After this the player must also perform controller calibration. This involves pointing the controller at various areas of the TV screen and pressing the A button. You may also tune your audio and visual settings in the system menu. |
Playstation 2
 |
| from left to right AV cable, Power cable, 8MB memory card, PlayStation 2 console, Dualshock 2 controller. |
 |
| (red) Controller ports, (blue) Memory card slots, yellow (USB slots). Also note the disc tray is open and a disc is inserted. |
 |
| (left to right) Ethernet port, Digital output, AV output, Power input. |
 |
| Blue button in the middle of the console is the disc eject button. The green button that is currently glowing red is the power/reset button. It glows red when it is in standby mode. |
 |
| Once pressed it will go green and the console will boot up. |
 |
| Happy Gaming. The DualShock 2 controller was one of successor to one of the most influential controllers of all time. It added joysticks to the already popular DualShock 1. It features two analogue joysticks which also functioned as buttons, four directional buttons, a select button, a start button, an analogue mode button, four face buttons and four shoulder buttons. |
 |
To open the system menu you must boot up the console without a disc inside.
This is where you can browse your saved data on your memory card or you can change settings such as screen position, data and time, etc. The system does not have any built-in system memory so to save your games on the system you need a memory card. There are lots of different sizes of memory card but the most common one is a black 8MB memory card that was shown in one of the previous pictures. |
 |
| Here are some examples of PlayStation 2 games. |
N64
 |
| The beautiful N64 in all its glory! (from left to right) N64 console, AV cable, Power cable, (below) Controllers. |
 |
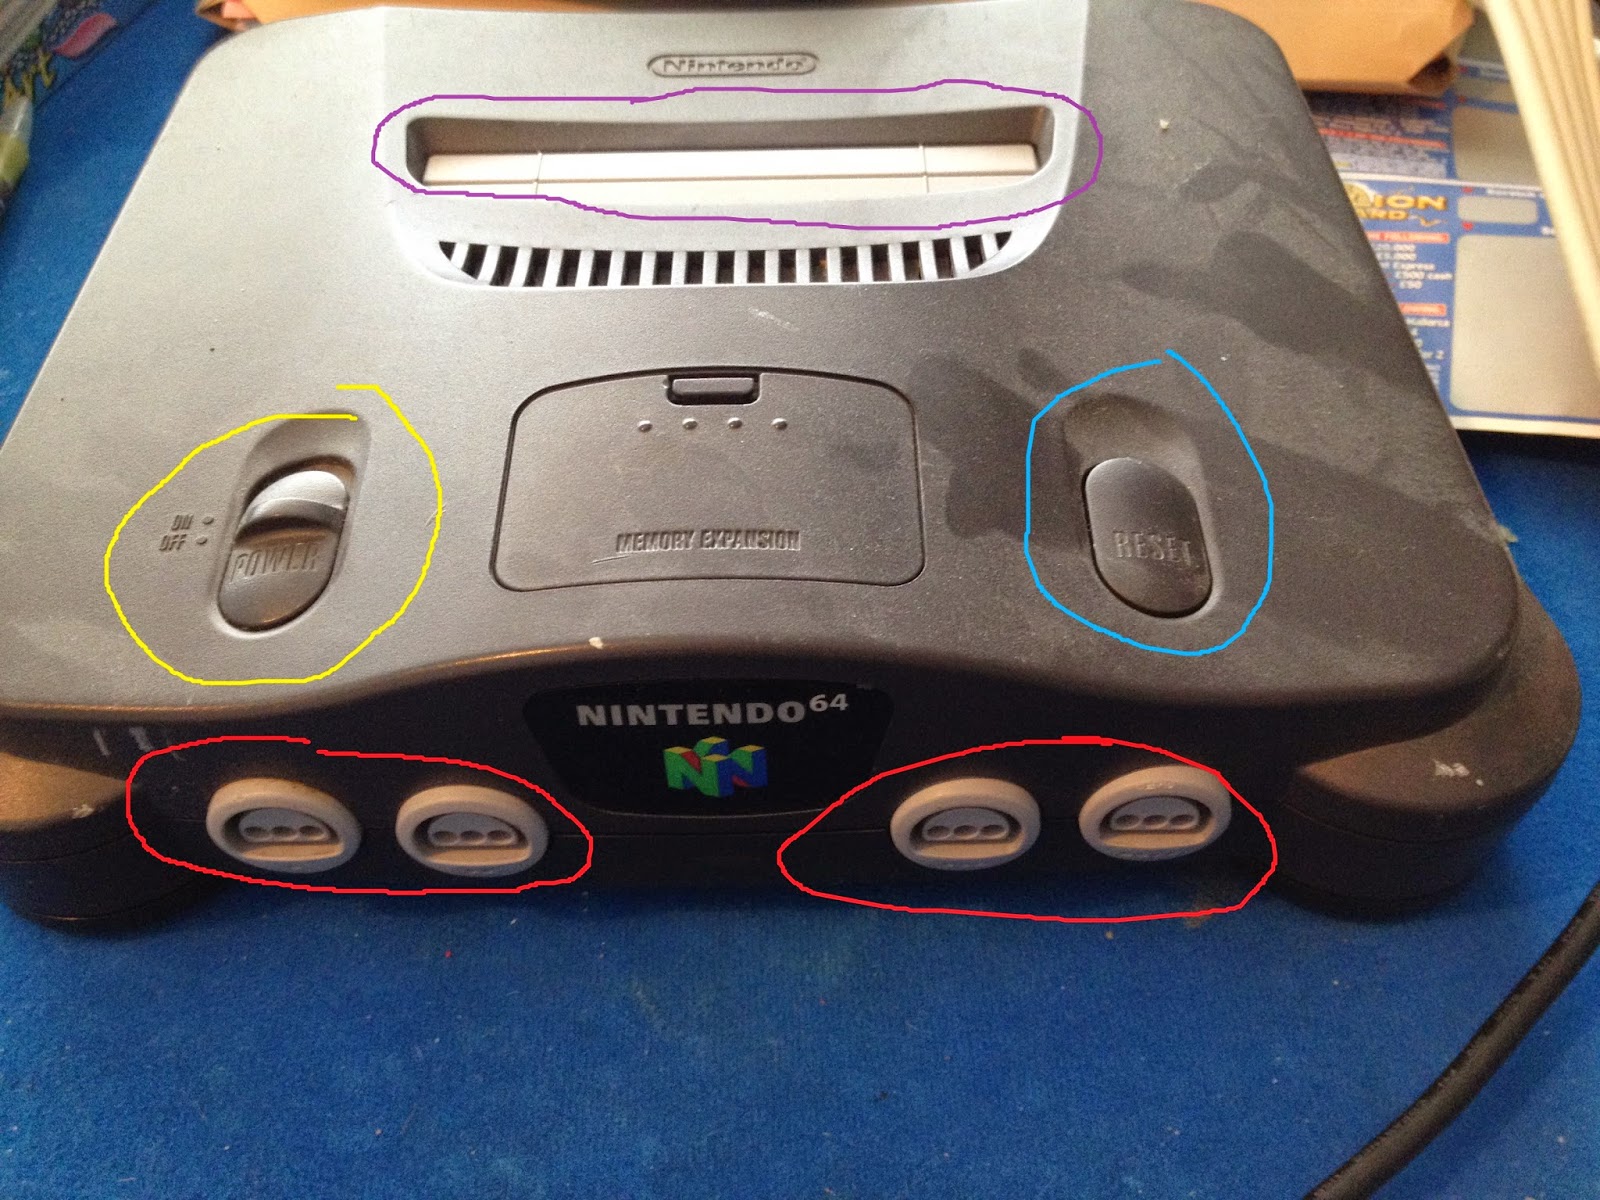
| (red) Controller ports, (yellow) Power switch, (blue) Reset button, (purple) Game cartridge slot. |
 |
| (left) AV output, (right) Power input. |
 |
| All connected up. |
 |
| AV + SCART adapter in the back of the TV. |
 |
| Game cartridge in. Flick the power switch on. |
 |
| Game away! |
 |
| The N64 has a famously unusual controller. It has three prongs that the player can use to hold on to. Most games were played with the joystick, which is in the centre. This meant that the player would have to hold the middle prong with their left hand and the right prong with their right hand. It's rather uncomfortable by today's standards. It features directional buttons, a joystick, a start button, two main action buttons, four extra face buttons and two shoulder buttons. |
 |
| Some examples of N64 games. The famous Banjo Kazooie, Super Mario 64, Turok and Legend of Zelda: Ocarina of Time. |
Playstation 3
 |
| (from left to right) PS3 console, controller cable, HDMI cable, power cable. The HDMI cable is much like the standard Audio Visual cable except that HDMI cables allow for 1080p full HD while the AV cable is limited to 720p or 1080i. |
 |
| USB ports. These are where the controller cable is plugged in and links the controller to the PS3. |
 |
| Similar to the PS2 the eject button is in the middle and the power/reset button is on the right. |
 |
| GTA V Disc being inserted into the console. |
 |
| (from left to right) ethernet cable port, HDMI output, digital output, AV multi-out, power cable slot. |
 |
| HDMI cable into the HDMI slot on the TV. |
 |
| Red light means it is in standby mode. |
 |
| Pressing the button turns the light green and starts up the console. |
 |
| Alternatively you can start the console by pressing the PS button on the controller (centre). The DualShock 3 is very much like the DualShock 2 except that is has the PS button used for bringing up the system menu and changes the L2 and R2 buttons to analogue triggers which can be held down at variable pressures to affect gameplay. Previously in the Dualshock 2 the L2 and R2 buttons were digital and could either be only on or off. |
 |
| When initially connecting the controller or charging it, you must connect it via the controller connection cable. |
 |
| After pressing the PS button (centre) the controller lights will flash and then stop at a steady colour. |
 |
| It is then that you can unplug the connection cable and play using the wireless controller. You must re-connect the cable whenever the controller requires charging. |
 |
| Game on! |
 |
| In the system interface there are many different settings that can be changed to suit your video and sound set up. These are things such as video resolution, screen position, internet network settings. You can also browse your installed games, photos, music, films and media applications such as Netflix and 4OD. |
 |
| I use a fairly simple sound set-up but there are options for surround sound in the sound settings menu. |
 |
| To turn off the console, hold either the PS button on your controller and select turn off system or hold the power button on the console itself. |
Nintendo DS
 |
| The power switch and the stylus used to control the Nintendo DS. |
 |
| In the middle is the DS game slot and below that is the charger cable port. |
 |
| Volume control (left). Headphone output (right) |
 |
| This is the Game Boy Advance games slot that features backwards compatibility with games from the previous Nintendo handheld, the Game Boy Advance. |
 |
| When the power switch is flicked on this screen boots up and asks you whether you want to play the game in the DS slot, the GBA slot or use the Pictochat feature or DS Download feature. You can also change settings here by pressing on the options tab at the bottom of the screen. |
 |
| When the battery gets low the power light goes to red. You should then plug in the console to a mains outlet. The orange charging light will come on to indicate that it is charging. |
Laptop
ASUS X550c
 |
| (above) charger cable. (below) ASUS X550c laptop. |
 |
| (from left to right) VGA port, HDMI port, ethernet cable port/LAN, USB ports, headphone jack. A VGA port transfers video information without audio so you can use a separate monitor should you wish it. The HDMI port has the same function but it also transfers audio and allows for 1080p or full HD video. |
 |
| Keyboard, scroll pad and power button (top left). |
 |
| CD disc drive for software or media. |
 |
| After pressing the power button and typing in the password I am greeted by the Windows 8 start-up screen. |
 |
| After turning the computer on I found that the only game installed on here was Minesweeper. |
 |
| However you can download and install games from an online marketplace such as this one or you can install directly from a CD disc. You can also change visual and audio settings by using the control panel. The control panel on Windows 7 is easily accessed from the start menu and it allows the user to change a multitude of options such as display options, audio options, network settings, devices and printers, power usage, etc. |
 |
| Turning off the console. |
PC
Custom Built: ASUS Motherboard, Six-Core AMD Processor, 2GB AMD Radeon Graphics Card
 |
| (from left to right) Ethernet cable, power cable, PC, power bar. |
 |
| Monitor with power cable (left) and VGA cable to connect the video output of the PC to the monitor. |
 |
| Wireless Perixx keyboard with wireless emitter and Razer Deathadder gaming mouse. |
 |
| Accessories: (top left) Philips speakers, (top right) Xbox controller, (bottom left) TurtleBeach EarForce P11 headphones, (bottom right) USB CD Disc reader. |
 |
| Front of the PC. These are various types of card readers and the power button. |
 |
| At the top are an audio output, microphone input and two USB 2.0 ports. |
 |
| The power switch and the power cable plug. |
 |
| (purple) keyboard port, (green) mouse port, 8 USB ports, Ethernet port/LAN, (red) microphone input, (green) audio output, (blue) audio input. (at the bottom, from left to right) VGA port, HDMI ports. |
 |
| On the back of the monitor. (left) power port, (right) VGA input. |
 |
| VGA cable connected and screwed it to ensure it doesn't diconnect. |
 |
| Power cables plugged in and connected via a power bar to the mains outlet. |
 |
| Plugging in mouse and keyboard into the USB ports. |
 |
| Mouse and keyboard set up. |
 |
| My PC uses an Ethernet cable rather than wireless internet. Wireless internet connection requires a wireless adapter which is usually built into the PC, but there are also USB wireless adapters. Ethernet cable in. |
 |
| And into the Broadband Router. |
 |
| Headphones plugged into the USB slot and the audio output. |
 |
| Make sure that the power switch is turned on. |
 |
| Press the power button. |
 |
| The log-in screen. Enter the password and we are in. |
 |
| Changing the sound system to speakers. First plug in the power cable of the speakers into the mains. |
 |
| Replace the headphone cords with the speaker audio output. |
 |
| Press the power button and adjust the volume accordingly. |
 |
| The ASUS audio configuration menu automatically opens. Select which device you have plugged in. |
 |
| Any audio settings can be changed in this menu and you can also test to see if a device is working properly. |
 |
To change display settings on my PC you must open the AMD Catalyst Control Center. This is because my PC uses AMD graphics card. Here you can change things like screen brightness, colour palette, etc. You can also change the various other settings associated with computers that are located in the control panel. My PC uses Windows 7 so the control panel is easily accessed from the start menu.
 |
| Games can be installed directly from a CD or they can be purchased and download via the internet through online marketplaces. There are many online marketplaces but three of the more popular ones are: Origin (Electronic Arts) |
 |
| Steam (Valve) |
|
 |
Uplay (Ubisoft)
This is a clip of me booting up a game called Invisible Inc. It was bought and downloaded from the Steam online marketplace.
|


No comments:
Post a Comment